
The Perfect Proposal: Outline, Example and Template!
In this post, I’m sharing the elements that go into a perfect proposal, a real life example that I sent for a project I won, and a template that you can duplicate and fill in yourself.
It’s 2 am, and you’re still working on the “quick proposal” you promised to send to your potential client. Sound familiar?
Proposals are a necessary evil as part of the process of landing a client. But, they don’t have to take 30 hours to create, nor do they need to be an agonizing exercise in trying to read the client’s mind. In this post, I’m sharing the elements that go into a perfect proposal, a real life example that I sent for a project I won, and a template that you can duplicate and fill in yourself!
Why do I believe in this proposal framework? Because it works. I have sent dozens of proposals (that look nearly exactly like what I’m about to outline) to a range of potential clients, from large companies to solopreneurs. Only twice did it not turn into a paying project. It’s based on a framework from my years working as a management consultant for PwC, the largest professional services firm in the world. I’ve adapted it based on the attention span of my clients and the scope of my work as an independent consultant, but it’s rooted in an outline that has landed billion dollar projects!
MINDSETS
There are a few important notes about how to approach the proposal creation process before we dive in:
Your client already told you everything:
Well, almost everything. In your initial conversations, your potential client outlined a problem, and probably provided additional information through their tone, context, urgency, etc. A big chunk of your proposal is going to focus on restating what your client already told you. Your job is to summarize it succinctly and then directly pair it with solutions.
In the same way that people love to hear the sound of their own name, your client will subconsciously love that you are using the same language they are using. If they call their marketing team the “Marketeers”, that’s what you should call them!
The more work you do on the proposal, the less work you’ll have to do on the project:
I think of proposals as my first draft at the project plan. The more information I put in and the more I think through what exactly I need to do in order to help the client, the easier it is to take it and run with it once the client says “alright, deal!” Plus, most clients love seeing all the detail (and—I don’t care what other Internet thought leaders say—it is highly unlikely that someone is going to steal your work and do the project themselves). As an added bonus, the more time you spend writing what you will do allows you to think through (and note) what you won’t do. Which is just as important for a successful project!
Time spent on formatting is time well-spent:
In our information overload society, sending a proposal that looks like a multi-page long read article can be a hard sell. Make your proposal something that your potential client wants to read! I prefer to use slides, and love a site called Slides Carnival that has amazing templates for simple designs. But, it doesn’t take much to make a work document look nice! Pick a font, use a color for your section headers, add in tables and bullet points. Think about what you’d read!
THE PERFECT PROPOSAL OUTLINE
The following outline is meant to be copied! There are a few different ways you can do that: try using the exact headers and subheaders on your presentation or document. Or, use the outline as a checklist to make sure you’ve included the right stuff.


Quick tip:
If the potential client had a job description, lift sentences and include them in this project overview section! It’s okay if it’s word-for-word, it shows that you are listening to them.

Quick tips:
Try to chunk your work into “phases.” Why? If your quoted price is too high, suggest simply starting with one phase.
The more specific you can be in your deliverable section, the better. For example, instead of just “marketing plan” you could say “3-month marketing plan in Google spreadsheet focused on new market launch.” Thinking through exactly what you are going to hand over to the client throughout or at the end of the project saves you from any miscommunication.
If you don’t know what’s going to happen at every stage of the timeline, just outline the first few weeks of activities. I often times pick 4 weeks and showcase what work will get done then. Thinking through this in the proposal also gives me a head start so I can hit the ground running the second they say yes and accept the proposal!

Quick tips:
Price your proposal by phases. That way, if your price is too high, you can suggest only one phase.
If I price hourly (which I don’t do often - but that’s for another post), I show my rate at $400-$600/hour. I know, that’s a lot! But I discount it from there, depending on how much I want the project. If it’s a startup I’m excited about working with, I’ll discount the project (sometimes as much as 50%). Now, they think they’re getting a slam dunk deal, and I still get paid a fair price.
Not entirely sure how much budget a client has? In one of your introductory calls, ask them if they have already decided on a budget for the project. Tell them you have a standard hourly or retainer rate which you are happy to quote, but want to make sure you design a proposal that fits their budget, and you’d be happy to adjust the time spent or tweak your rate to fit. Of course, only if it’s really enough money for you!
Outling the next steps makes it clear exactly what they do next, and is your roadmap for what you say in your next follow up emails.


TEMPLATE AND EXAMPLE
Take a look at a real life example (I changed the client name, but everything else is real, even the pricing!). And, copy the template yourself and fill it in.
Hope this makes your next proposal a breeze!

Procrastination And Perfectionism - Two Sides Of The Same Coin?
Procrastination is the under-commitment of time and energy to a task. Perfectionism is the over-commitment of time and energy to a task.
Late nights at the office are the worst. I feel like if I were better at managing my time, or if I could stop obsessing over the insignificant details of my projects, the late night conundrum would never plague me again. Fortunately for us, help is on the way: in the form of procrastination guru Jullien Gordon. Jullien is a PurposeFinder and Motivational Speaker who recently published a book on confronting perfectionism and procrastination. In Good Excuse Goals, Jullien defines procrastination and perfectionism as two sides of the same coin. Procrastination is the under-commitment of time and energy to a task. Perfectionism is the over-commitment of time and energy to a task.
Confused about how this perspective can help you, Miss In-the-Office-at-Midnight-And-Seriously-Considering-a-Cupcake-Run? Let’s do a word problem: you have a report to write. You know that writing an excellent report will take you 10 hours. A procrastinator will start the paper with 6 hours left until the deadline, causing her to cram and rush through the writing process. A perfectionist will commit 15 hours to writing the paper, using the extra time to (over) analyze and (over) edit the report, so much that it may take away from the quality of her work.
Neither are ideal options. So what are we to do to fix this dilemma? How can we avoid procrastinating and stop perfecting to become better at getting things done? Julien offers a few great tips:
Positive Peer Pressure
That’s right. Peer pressure will help you get it done.
Jullien makes a great point: people are more comfortable disappointing themselves than they are disappointing other people. It sounds counterintuitive – we don’t usually think of peer pressure as a good thing. But build yourself a circle of accountability and you can bet you’ll be doubling up on your desire to finish projects on time and finish them well.
So how does a PYP build a circle of accountability? Before you start on your report, send an email and let your co-workers know that you they should expect the completed first draft of the report in their inboxes by close of business today. Determining an appropriate deadline for the first draft is a good start to setting goals. Getting other people involved to commit to the deadline is an even better way to move towards achieving goals. This type of transparency will also make your project a little more social and will help you feel less like you’re emailing memos into a black hole, never to see them again.
For a procrastinator, this is a huge step to getting started early. You don’t want to let other people down – or look like a complete slacker – so you now have a real incentive to get a head start.
Get Feedback Along the Way
For a perfectionist, it is an important step to get feedback along the way to make sure that your final product matches the expectations of the people receiving it. Sometimes you get caught up in details that no one else notices (guilty!). Getting feedback from your co-workers will help you make sure that your report is excellent in the eyes of the receiver, as well.
Once you get the first draft out of the way, you are 80% of the way towards achieving your goal. You can spend the final 20% of your time on the report focused on refining the report into a great final product.
The First Domino
Now that you are on the hook to finish your report, where do you start?
Think of another example: who hasn’t spent many a lazy Sunday dreaming of a visit to an exotic destination? Getting your act together and actually going on the vacation is much easier said than done. After the Google search to plan the best sites to visit, determine the right hotels, and estimate the cost, we analyze vacation days from work, make a spreadsheet to budget the trip… Big decisions require a lot of work, and it’s easy to either put off thinking about logistics or alternatively to consider every little detail before actually setting the wheels in motion. Jullien had some advice for anyone like me.
Just buy the plane ticket, already!
Buying the ticket takes less than 15 minutes. After that, you are on the hook to make everything else fall into place. Jullien calls this tool to overcoming procrastination and perfectionism focusing on the “first domino.” If you pick the easiest, most impactful domino to knock out, it sets the rest of the tasks in motion. Tackle the lowest hanging fruit and you are on your way towards accomplishing your goal.
The tricky part is realizing that the first domino probably isn’t the chronological first step. You’d think you want to know all the details before buying your plane ticket for vacation. But knowing all of the details is an excuse not to plan your vacation. For comparison, think about how effective you already are when you apply the first domino trick to reading your email. If you read every single email chronologically, you’d never get to the important ones. Instead, when you see an email in your inbox from your boss, you’ll probably skip over the LivingSocial deal and the daily news headlines to open and respond to it.
So take a moment to figure out the first domino for the report and go for it. Writing the introduction first might be tough, but finishing that tough middle paragraph makes wrapping up the rest of the report a breeze.
We all experience the effects of procrastination and perfectionism in the workplace. Especially if you’re new to your firm, you can be under a lot of pressure both to figure things out all on your own and to juggle multiple projects simultaneously. But with your newfound strategies to prioritize low-hanging fruit and to work with a circle of peers who hold you accountable for the project, you should be right on track to a decent night’s cupcake-run-free sleep after a project done well.
Originally published on Forbes.

11 Tips for a Stress-Free Video Call
Read on for a list of absolutely everything to do, from your tech setup to “designing your set,” to making sure you look and sound fantastic on your video interview.
You’ve landed the interview of your dreams. It’s for a remote job that pays more than you ever thought you could make working part-time (or maybe it’s for that international gig you’ve been daydreaming of). In short, you are over the moon!
But the interview is over Skype and you are petrified. Of course, you’ll try to look natural and you’ll rehearse what you should say. But what if there is a terrible echo? Is it okay to join the interview sitting in bed in your room? (Where else will you find a background that hides your messy apartment!?)
You’ve got this. Read on for a list of absolutely everything to do, from your tech setup to “designing your set,” to making sure you look and sound fantastic on your video interview.
1. Get Headphones
If you do nothing else to prepare for a video chat, do this one thing: use headphones. An echo ruins a video chat, fast. And lags in connection and internet blips can easily create an echo, delay, or other sound disruption that can be lessened with headphones. People will forgive your video quality, but they won’t forgive your sound. If the person on the other end can’t understand what you are saying, you’re in trouble!
So, dig up those headphones that came with your first iPhone, or buy a pair of cheap headphones with a mic. (For example, Skullcandy makes a pair for $20.) Your sound will be crisper, the risk of echo will be reduced drastically, and those sirens and dogs barking in the background won’t get in the way of the great impression you’re making on screen!
Note: even if you don’t have headphones with a mic, regular old headphones will work to reduce the echo as well. A sketchy set of headphones is better than no set of headphones.
2. Download The Necessary Tech
Most video chat systems require time to download either an application or a plugin. Do a quick search of the technology that your video interview is using, and see what you need to prepare.
Two common (and free!) platforms to use are Google Hangout and Skype. There is a quick plugin for Google Hangout that requires a browser restart (download here), and an easy application download for Skype (find your version here). There are hundreds of other video platforms that you could use, such as Cisco WebEx and GoToMeeting, so setting aside 15 minutes before your interview to make sure you have the right tech downloaded will ensure you are prepared!
3. Test Your Internet
Being on a video chat requires solid, fast internet speed. Starbucks Free WiFi just isn’t gunna cut it. Test the internet speed at the location where you are going to be joining the video interview by running a free test at speedtest.net. Google recommends an upload and download speed of at least 4 Mbps for a solid video connection.
Also, wireless internet signal can fade in and out. If you have an ethernet cable handy (they usually come free with your internet router or you can purchase one on Amazon for less than $10), plug it in to ensure you have a steady connection.
4. Check Your Sound Inputs and Outputs
Do a quick check of your sound settings to make sure everything is set correctly. Every video chat system has slightly different settings, but most will default to “built-in audio,” which means the speakers and microphone on your computer. If you are using headphones and there is an option to set to your headphone audio (and microphone) instead, click it!
On Skype, you can try speaking and watch the audio bar rise and fall with your volume.

If you are using Google Hangout, try playing a test sound to make sure you can hear in your headphones.

5. Plug In Your Charger
Video drains your battery more than nearly any other program you can run on your computer. If you are taking your video interview using a laptop or tablet, charging it to 100% is a great idea. An even better idea is to have your laptop plugged in! Sort through your closets and find an extension cord if you need it so that you can be in the best position and not run out of juice in the middle of your call.
6. Design Your “Set”
Actively think about setting up what is behind you in the shot for your video interview. As executive recruiter Jennifer Johnson shared, being in a big room and having too much depth behind you can be distracting. It’s best to position yourself a few feet from a wall, and have one or two tasteful decor components in the background. For example, a painting, a plant, or an organized bookshelf. Imagine meeting with the CEO of a huge company, and think about what how their desk is positioned: try to create the same setup for yourself. A white wall absolutely works, but if you have the time to “design” your set, it can certainly boost the impression you make!
7. Bring Your Camera To Eye Level
“It looks like I have a double chin!” That was Laura Belgray’s reaction when we started to set her up for her fantastic Skillcrush webinar. You know what she’s talking about: you look down at your laptop, while your chair has you perched up high, and the camera hits you at possibly the least-flattering angle of your neck you’ve ever seen.
Prop your laptop up so that you are looking at the camera at eye level, instead of down. Use a few textbooks, a pile of magazines, or even a rectangular tissue box to set your laptop up a few inches on your desk. It makes you look relaxed and composed, is a more flattering angle, and saves you from neck cramps.
8. Light From The Front
A cardinal mistake of newbies on video interviews is to have light shining from the background. If you have a big window with a view, why not show it off?
Doh! You want the (spot)light on your face, not on the background! Think about getting your school pictures taken (I know, I know, terrible memories of braces. But bear with me on the analogy…). Where did that huge, blinding flash come from? Directly in front of you! So when you setup your video interview or chat, think about your school pictures and place your lighting in the front.
Natural lighting is best, so face towards a window if you can. If you are in a darker room, or you are getting on video chat in the evening, find a lamp that you can plugin and place about a foot in front of your laptop to give you some good lighting. (Just relying on the lighting from your laptop might give an eerily creepy glow…) If you have the time, take the extra step and take away, turn down, or turn off the lights behind you, as well.
To show you just how important light can be for the professionalism of your set, I took a few screenshots so you can see how Google Hangout responds to light. Which one do you like best?
With my window directly behind me, you get to see my great NYC view! But, my face? Not so much…
With the focus adjusted, you can see me on camera, but I’m a little fuzzy (almost ethereal!?) because of the light behind.
Aha! The light coming from the window in front of me makes for a crisp, clear, and professional video chat image.
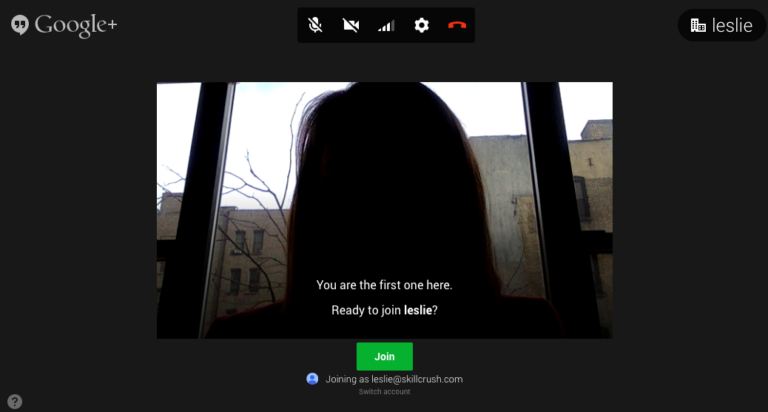
With my window directly behind me, you get to see my great NYC view! But, my face? Not so much…

With the focus adjusted, you can see me on camera, but I’m a little fuzzy (almost ethereal!?) because of the light behind.

Aha! The light coming from the window in front of me makes for a crisp, clear, and professional video chat image.
9. Check Yourself Out
Before you go live, make sure to check that your video camera works and that you look great on screen! But, you don’t want to login to your interview while you’re checking your setup. Instead, use another program to see how you look before going live.
The easiest way to test how you look is the audio/video settings in Skype. Once you open up Skype, click “Preferences” from the menu and open up the Audio/Video tab. Your camera will turn on and you will see yourself!
If you don’t have access to Skype, there’s a great workaround for testing out how you look on Google Hangout. Pop into Google Calendar and open up a meeting invite. There is an option to join by Video Call (see the bottom field in the screenshot below). Click that, and you’ll open up a Hangout with yourself.

10. Do A Test Chat
The best way to know that everything will work correctly is to do a test run! Try out the technology you are using in a test call before your interview or chat starts. Setup everything as close to the way you will do it on interview day to make sure you have all variables under control.
Quick tip: haven’t talked to your roommate from college in a while? Instead of giving her a call by phone, see if she’s up for jumping on a video chat! You get to test your sound and audio so you feel confident that it works, and catch up with a great friend while you’re at it.
BONUS!
11. Think Solid + Bright
Bright colors look amazing on video. Avoid wearing stripes, paisley, and the like, as the detail can come across as fuzzy and distracting on video. (Ever notice how the best dressed at Hollywood awards shows are usually the solid, bold colored dresses, and the outfits that crash and burn are often patterns?). Particularly outstanding colors for camera include scarlet red, emerald green, and royal blue. Pick your favorite!
Originally posed on Skillcrush.